Polishing timber floors is a rewarding journey that can transform the look of your home. Timber adds character and elegance to any space with its natural beauty and warmth.
However, these floors can lose their shine over time and look dull due to foot traffic, dust, and spills. With the right tools and techniques, you can restore their lustre, protect them from damage, and extend their life.
This guide is for beginners, so you don’t need to be a professional to achieve desired results. By following our step-by-step process, you’ll learn how to polish your timber floors and give your space a fresh and shiny new look, all by yourself.
Preparing Your Timber Floors for Polishing
Before you start the process of floor polishing Geelong, make sure you are prepared well. The results you achieve will heavily depend on how well you prep your floors. Proper preparation not only ensures a smoother polishing process but also guarantees a more stunning finish.
Clearing the Area
The first step in preparing your floors for polishing is to clear the space entirely. Here’s what you need to do:
- Remove all furniture, rugs, and any other movable items from the room. This provides you clear access to the entire floor surface without any obstructions.
- Next, inspect the floor for any nails, staples, or anything else that might be protruding. These can tear the sandpaper during the sanding stage, which is crucial for preparing the floor for polishing.
- Secure loose floorboards. Not only does this make the polishing process more effective, but it also prevents any potential injuries.
Cleaning the Floors
Once the area is cleared and the floor is inspected, it’s time to clean. Dust, dirt, and any other material on the floor can affect the polishing process, so it’s important to begin with a spotlessly clean surface.
- Start by vacuuming the entire floor to remove dust and loose debris. A vacuum with a soft brush attachment is ideal for this task to avoid scratching the timber.
- After vacuuming, mop the floor with a damp (not wet) mop. Use a cleaning solution suitable for timber floors – this will help remove any grime or residues left on the surface.
- Let the floor dry completely before moving on to the next step. Humidity and moisture can affect the application of polish and the final outcome.
Choosing the Right Polishing Method
Now that your timber floors are cleaned and prepared, it’s time to choose the most suitable polishing method. The choice between oil-based and water-based polishes comes down to the finish you desire and the specific needs of your timber floors.
Oil-Based Polishes
Oil-based polishes are renowned for their long-lasting and lustrous finish. They penetrate deep into the wood, enhancing its natural patterns and colours. Here are some advantages and considerations:
- They offer a rich, glossy look that can add warmth to your space.
- The drying time is significantly longer compared to water-based options, often taking 24 hours or more to dry completely.
- Oil-based polishes have a strong odour; thus, proper ventilation is essential during application and drying.
- Ideal for heritage homes or where a traditional aesthetic is desired.
Water-Based Polishes
Water-based polishes have gained popularity for being environmentally friendly and quicker to dry. Here’s why you might consider them:
- They dry relatively fast, often within a few hours, allowing you to use the room sooner.
- These polishes emit less odour, making them a more comfortable option for homes.
- They tend to retain the wood’s natural colour better over time without yellowing.
- Perfect for households looking for a low-maintenance, durable finish.
Gathering the Necessary Tools and Materials
Before starting your DIY timber floor polishing process, it’s essential to gather all the necessary tools and materials. Having everything on hand will streamline the process, making it more efficient and less stressful. Here’s a list of tools and materials you must arrange:
- Floor Sander: Essential for sanding down the timber floors. You can rent these from a local hardware store if you don’t own one.
- Hand Sander: For reaching the corners and edges that the floor sander cannot.
- Vacuum Cleaner: To clean up dust and debris after sanding.
- Soft Bristle Brush: To gently sweep away any residual dust before applying polish.
- Applique Pads or Rollers: For evenly applying the floor polish.
- Sandpaper: You’ll need various grits, starting from a coarser grit (around 24-36) for the initial sanding, moving to medium (50-80), and finishing with fine grit (100-120) for the final sand.
- Timber Floor Polish: Choose a quality polish suitable for your type of timber flooring.
- Masking Tape: For protecting baseboards and any areas where you don’t want the polish to reach.
- Safety Gear: Dust mask, goggles, and ear protection for your safety during the sanding process.
Step-by-Step Guide to Polishing Timber Floors
Now that you have all your tools and materials ready, let’s walk through the process of polishing your timber floors.
-
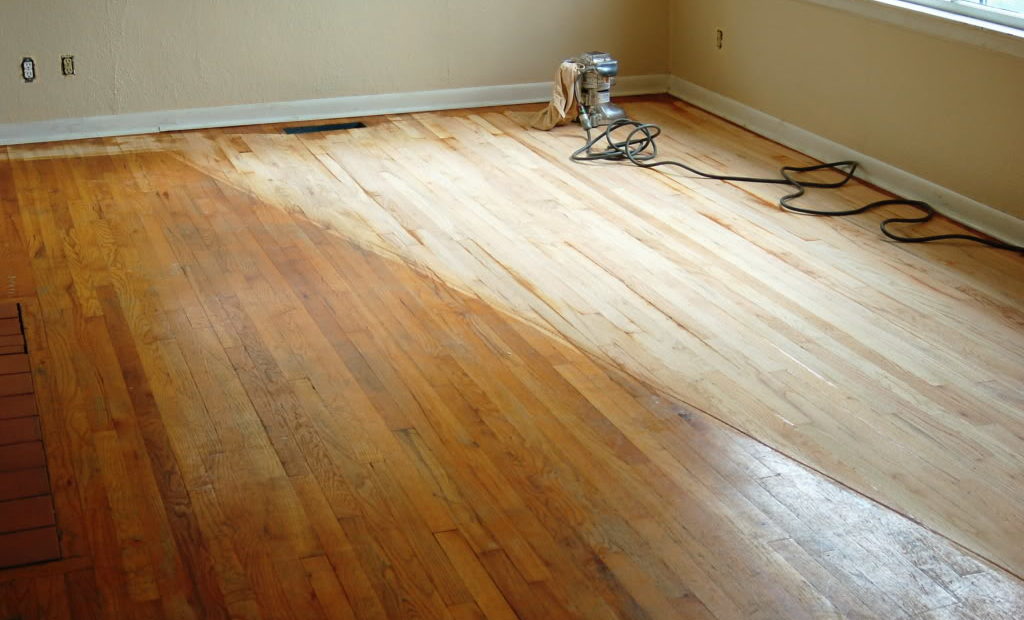
Sanding the Floors
The first step is to sand the floors to remove the old finish, scratches, or any other imperfections. This will prepare the timber for a smooth and even application of polish.
- Start with the coarse grit sandpaper and move across the floor in smooth, even passes, always going with the grain of the wood.
- Switch to medium grit sandpaper for the second pass to remove any roughness caused by the initial sanding.
- Finish with fine grit sandpaper to achieve a smooth surface.
After sanding, use a vacuum cleaner followed by a soft bristle brush to ensure all dust is removed from the floor.
-
Applying the First Coat of Polish
Before you start, ensure the room is well-ventilated. Apply masking tape to protect any areas you don’t want to polish.
- Stir the polish gently to avoid creating bubbles.
- Using an applique pad or roller, begin applying the polish in thin, even coats along the grain of the wood. Avoid pooling or over-application, as this can lead to uneven drying and a less attractive finish.
- Allow the polish to dry according to the manufacturer’s instructions, usually a minimum of 24 hours.
-
Sanding Again
After the first coat of polish has completely dried, it’s time for another light sanding. This step will remove any imperfections and help the second coat of polish adhere better.
- Using the finest grit sandpaper, lightly sand the entire floor. This should be more of a buffing than actual sanding.
- Clean the floor again with a vacuum and soft brush to remove all dust.
-
Applying the Final Coat of Polish
Repeat the process of applying the polish just like you did the first time. Remember to work in thin, even coats and allow ample drying time.
After the final coat, your floors should look fresh, shiny, and fully revitalised. Remember, the floors may take several days to fully cure, so avoid heavy furniture placement or walking with shoes during this period to ensure the best results.

Tips for Maintaining Polished Timber Floors
Maintaining your polished timber floors ensures they stay beautiful and durable for many years. Here’s how you can keep them in the best condition.
Regular Cleaning
Regular cleaning is important to maintain the shine and health of your timber floors. Use soft-bristled brooms or a dust mop for daily cleaning to remove dust and grit that can dull the surface. Once a week, use a slightly damp mop with a gentle, pH-neutral cleaner to clean the floors.
Avoid using excessive water or harsh chemicals, as they can damage the wood. Immediately clean up any spills to prevent watermarks or stains.
Avoiding Scratches
Scratches can mar the beautiful surface of your timber floors, so take proactive steps to prevent them. Place protective pads under the legs of furniture to avoid scratches when items are moved.
Encourage a no-shoes policy or use rugs and mats in high-traffic areas to minimise the abrasive effect of dirt and grit. Trim pet nails regularly to avoid scratches from claws.
Reapplying Polish
Every few months, depending on the level of traffic and wear, your floors might need a new coat of polish to maintain their shine. Before reapplying, ensure the floor is clean and dry. Use the specific type of polish recommended for your flooring, applying it with a flat mop in thin, even layers.
Allow it to dry completely before walking on the floor or moving furniture back into place. This regular upkeep will extend the life and beauty of your timber floors.
Troubleshooting Common Issues
Even with the best care, you might face some issues with your polished timber floors. Here are solutions to common problems.
Uneven Finish
An uneven finish can result from improper application of polish or uneven sanding before polishing. If you notice an uneven sheen, it may be necessary to strip the previous polish layer and reapply it correctly.
Ensure the floor is thoroughly cleaned and dried, then apply the polish in thin, even coats, taking care to spread it uniformly across the floor.
Sticky Residue
If your floors feel sticky after polishing, it could be due to excess polish or not allowing enough drying time before walking on them. To fix this, first, allow more time to see if the residue dries up. If the stickiness persists, you may need to remove the excess polish.
Use a cloth dampened with mineral spirits for solvent-based polishes or water for water-based polishes, and gently rub the area to remove the residue. After removing the sticky layer, clean the floor with a damp mop and allow it to dry completely.
Frequently Asked Questions
How often should timber floors be polished?
The frequency of polishing timber floors depends on the amount of foot traffic and the level of wear and tear they experience. Generally, it is recommended to polish timber floors once every 1 to 3 years to maintain their shine and protect their surface. In rooms with high traffic, such as living rooms and hallways, you might need to polish more frequently than in bedrooms or less frequently used areas. Regular maintenance, including cleaning and immediately addressing spills, can extend the time between polishing sessions.
Can I polish timber floors without sanding?
Yes, it is possible to polish timber floors without sanding, especially if the floors are in good condition and you are simply looking to refresh the shine. This process is called a screen and recoat, where the top layer of the floor is lightly abraded to help the new coat of polish adhere without removing the wood. However, for floors with significant wear, deep scratches, or stains, sanding may be necessary before polishing to achieve a smooth, rejuvenated appearance.
How can I polish my wood floor at home?
Polishing your wood floor at home involves a few steps. Here’s a simplified guide:
- Firstly, thoroughly clean the floor. Use a vacuum to remove dust and then mop with a wood floor cleaner to ensure the surface is free of any grime or residues.
- Once the floor is dry, apply a thin layer of wood floor polish using a flat mop or applicator pad. Follow the grain of the wood as you spread the polish evenly across the surface.
- Allow the polish to dry according to the product instructions. This typically takes at least an hour but can vary.
- Apply a second coat if the manufacturer recommends it for the best results. Allow the second coat to dry completely before moving furniture back into the room or walking on the floor.
Choose the right polish for your timber type and follow the product’s specific instructions, and you will easily achieve the best results.
Timber floor polishing not only enhances the beauty of your home but also protects your flooring for years to come. The process may seem difficult in the beginning, especially for beginners, but by following a systematic approach, you can achieve professional-looking results.
Just remember to start with a clean surface, choose a compatible polish, apply the polish evenly and allow sufficient drying time. By dedicating time and effort to polishing your timber floors, you not only restore their lustre but also extend their lifespan, making this endeavour both satisfying and cost-effective.
If you face any difficulty during the process or your floors need special care, consulting a floor polishing Geelong professional can help. Timber Floor Sanding Melbourne boasts years of experience in the floor sanding and polishing industry, so you can rely on our expert team to get the best results. Reach out to our team to see how we can transform your floors!
