Floor sanding can be an exciting time for homeowners, especially when they want to give their floors a new lease of life. However, with the excitement comes many questions, including how long it will take to complete the project.
While every project is unique, some factors can give you an estimate of the duration of your floor sanding Geelong project.
This guide will provide detailed information on the floor sanding timeline, including the factors that affect on how long does floor sanding takes and how to prepare for the sanding process. If you’re planning on sanding your floors and want to know what to expect, then keep reading!
Floor sanding process
The floor sanding process is an essential step in rejuvenating and reviving tired and worn-out floors. Whether you want to restore the beauty of hardwood, reclaim the charm of parquet, or refresh the elegance of engineered flooring, understanding the floor sanding timeline is crucial for a successful project.
When it comes to floor sanding, it is not just a quick and straightforward task. It requires careful planning, preparation, and execution to achieve the desired results. The process involves several stages, including sanding, filling gaps, and applying finishes, all contributing to the timeline.
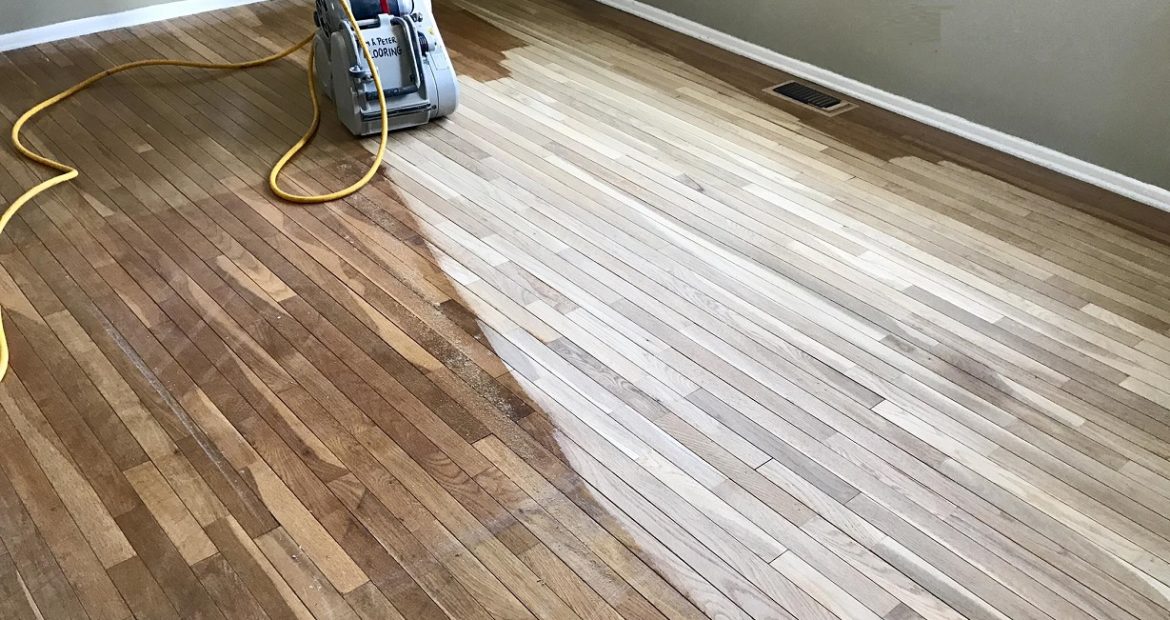
Firstly, the floor sanding process begins with removing any existing finishes or coatings. This is typically done using a floor sander, which strips away the old layers and exposes the bare wood. Depending on the condition and type of flooring, this initial sanding may take a few hours to a full day.
Once the surface is prepared, the next step is to address any gaps or imperfections in the floor. This involves filling them with a suitable filler material, which needs time to dry and cure properly. The drying time can vary depending on the type of filler used, but it usually takes around 24 hours.
After the filler has dried, the floor sanding Geelong continues with multiple sanding passes to achieve a smooth and even surface. This step involves using progressively finer grits of sandpaper to remove any remaining imperfections and create a uniform finish. The number of sanding passes required depends on the condition and type of wood, but it typically takes a day or two to complete.
Once the sanding process is finished, the floor needs to be thoroughly cleaned to remove any dust or debris. This is a crucial step to ensure a flawless finish and proper adhesion of the chosen finish or coating. Cleaning the floor can take a few hours and should be done meticulously to achieve the best results.
Finally, the last stage of the floor sanding timeline involves applying the chosen finish or coating. This could be a varnish, oil, or wax, depending on the desired look and level of protection. The application process can vary, with some finishes requiring multiple coats and drying time between each layer. This final step can take anywhere from a day to several days, depending on the specific finish chosen.
Factors that influence the duration of floor sanding
The duration of how long does floor sanding take can vary depending on several factors. Understanding these factors can help you plan your project more effectively and have realistic expectations about the timeline.
1. Size of the floor:
One of the primary factors influencing the duration of floor sanding is the size of the floor area. Naturally, larger areas will take more time to complete compared to smaller ones. Measuring the square footage accurately is essential to estimate the time required.
2. Condition of the floor:
The condition of the floor before sanding can also impact the timeline. If the floor has extensive damage, such as deep scratches, stains, or uneven surfaces, it may require more repair time and additional sanding passes to achieve the desired result.
3. Type of wood:
Different types of wood have varying hardness levels, which can affect the sanding process. Harder woods may require more time and effort to sand compared to softer woods. Additionally, certain exotic or rare woods might require specialised techniques, potentially extending the timeline.
4. Number of sanding passes:
The number of sanding passes needed to achieve the desired finish can also influence the project’s duration. Sometimes, multiple passes are necessary to remove deep scratches or stains, resulting in additional time requirements.
5. Drying time between coats:
If you plan to apply a finish or stain after sanding, it’s crucial to consider the drying time required between coats. This can add extra days to the overall timeline, as each coat needs to dry fully before proceeding with the next.
6. Additional services:
If you need additional services, such as floor repairs, filling gaps, or applying a protective sealant, these will also impact the overall duration of the project. It’s important to factor in the time required for these services when planning your timeline.
By considering these factors and discussing them with your flooring professional, you can get a more accurate estimate of how long your floor sanding project will take. Remember that each project is unique, and unforeseen challenges or complexities may arise, potentially extending the timeline.
Preparations before starting the floor sanding process
Before diving into the floor sanding process, it is crucial to make adequate preparations to ensure a smooth and successful outcome. Taking the time to properly prepare your space correctly will not only save you time and money but also ensure the best results possible.
Firstly, it is essential to clear the room of all furniture and belongings. This includes removing rugs, curtains, and other items that might obstruct the sanding process. By clearing the room, you provide the floor sanding professionals with a clean and open space to work in, allowing them to move freely and access all floor areas.
Next, ensure that the floor is thoroughly cleaned. This involves removing any dust, dirt, or debris that may have accumulated over time. A thorough vacuuming or sweeping followed by a damp mop will help eliminate any loose particles that could interfere with the sanding process.
Additionally, it is essential to inspect the floor for any loose boards, nails, or other potential hazards. These should be addressed and fixed before beginning the sanding process to avoid any accidents or damage to the equipment.
Lastly, if there are any gaps or cracks in the floor, it is recommended to fill them with an appropriate wood filler. This will help create a smooth and uniform surface, ensuring the sanding process produces the desired results.
By making these necessary preparations before starting the floor sanding process, you set the stage for a successful and efficient restoration of your flooring. It may seem like extra work, but investing time in these preparations will ultimately contribute to achieving a flawless and durable finish that will enhance the beauty and longevity of your floors.

Overview of the different stages involved in floor sanding
Floor sanding is a meticulous process that involves several stages to achieve a smooth and beautiful result. Understanding the timeline of these stages is crucial for planning and managing your floor sanding Geelong project effectively.
The first stage is preparation. This involves clearing the room of furniture, removing any carpet or existing flooring, and ensuring the surface is clean and free of debris. It’s essential to have a clean and empty space for the sanding process to begin.
Next comes the sanding itself. This is the most time-consuming stage and involves using specialised sanding equipment to remove the old finish, stains, and imperfections from the wood surface. The process typically starts with a coarse grit sandpaper to level the floor and gradually moves to finer grits for a smoother finish. The number of sanding passes required depends on the condition of the floor and the desired result.
Once the sanding is complete, the next stage is filling. Filling involves using a wood filler to fill in any gaps, cracks, or nail holes in the floor. This step is important to ensure a seamless and uniform appearance. The filler must dry and harden before moving on to the next stage.
After filling, the floor is ready for the finishing stage. This involves applying a protective sealant or finish to enhance the appearance and durability of the wood. The type of finish used may vary depending on personal preference and the specific requirements of the floor. Applying multiple coats and allowing sufficient drying time between coats is crucial for achieving a long-lasting and flawless finish.
Lastly, the curing stage is essential for the finish to harden and set fully. This can take anywhere from a few days to a couple of weeks, depending on the type of finish used and environmental conditions. It’s essential to avoid stepping on the floor or placing furniture until the finish has fully cured to prevent any damage or compromises to the final result.
Estimating the time required for sanding different types of floors
Estimating the time required for sanding different types of floors is crucial in planning and scheduling your floor sanding project. Each type of flooring material and its condition will dictate the time needed to achieve the desired results.
Hardwood floors, for instance, are typically the most time-consuming to sand due to their durability and thickness. The sanding process involves multiple stages, including rough sanding, fine sanding, and buffing, which can take several days to complete. Additionally, the size of the area to be sanded will also impact the overall time needed. Larger rooms or open floor plans may require more time and attention to detail.
On the other hand, softwood floors, such as pine or fir, may require less time for sanding. These floors are generally softer and easier to work with, allowing quicker progress. However, it’s important to note that the condition of the floor, such as deep scratches or unevenness, may still extend the time needed for sanding and refinishing.
Laminate or engineered wood floors with a thin veneer layer can be sanded but require more caution and expertise. The sanding process for these types of floors is typically faster since only a tiny amount of the veneer needs to be removed. However, it’s crucial to engage professionals with experience in working with these materials to avoid damaging the floor.
Other factors that can affect the sanding timeline include:
- The complexity of the floor’s layout.
- The presence of obstacles like furniture or fixtures.
- Any necessary repairs or treatments before sanding.
It’s essential to account for these variables when estimating the time required for your specific floor sanding project.
Accurately estimating the time needed for floor sanding will help you plan accordingly and minimise any inconvenience. Consulting with professionals or experienced floor sanding contractors can provide valuable insights and ensure a realistic timeline for completing your project.
The role of equipment and tools in speeding up or slowing down the process
The equipment and tools used in floor sanding play a crucial role in determining the speed and efficiency of the process. The right tools can significantly speed up the sanding process while using outdated or inefficient equipment can slow it down.
One of the critical tools in floor sanding is the floor sander itself. A high-quality, professional-grade floor sander can remove old finishes and imperfections quickly and effectively.
These sanders are designed to cover large areas in a short amount of time, allowing for a faster completion of the project. On the other hand, using a low-quality or outdated floor sander can result in uneven sanding, requiring additional time and effort to achieve the desired results.
Another essential tool is the edger, which sands the edges and corners of the floor that the floor sander cannot reach. A powerful and efficient edger can save time by effectively filing these hard-to-reach areas, ensuring a seamless finish.
In contrast, using a weak or inefficient edger can slow down the process as it may require multiple passes or manual sanding to achieve the desired results.
Additionally, the choice of abrasive materials, such as sandpaper or pads, can also impact the speed of the sanding process. High-quality abrasives can cut through the floor’s surface more efficiently, reducing the time required for sanding.
Conversely, using low-quality or worn-out abrasives will lead to slower progress and may require frequent replacements, adding to the overall time and cost of the project.
Common challenges and delays encountered during floor sanding
While floor sanding can transform the look of your space, it’s essential to be aware of the common challenges and delays that can arise during the process. By understanding these potential setbacks, you can better plan and manage your expectations for the project.
One common challenge is the discovery of hidden issues beneath the surface. As the sanding process begins, it’s possible to uncover hidden damages, such as uneven subfloors, cracks, or rot. These issues may require additional repairs before the sanding can continue, adding time and cost to the overall project.
Another challenge is the presence of stubborn stains or finishes that are difficult to remove. Some colours, like ink or oil-based substances, may require extra effort to eliminate. Similarly, old or thick finishes may require multiple sanding passes to achieve the desired smoothness. These additional steps can extend the timeline for completion.
Delays can also occur due to environmental factors. Humidity levels, temperature, and ventilation can impact the drying time of the floor after each sanding pass. High humidity or inadequate airflow can slow the drying process, leading to longer wait times between sanding stages and potentially prolonging the overall project duration.
Additionally, unforeseen circumstances such as power outages, equipment malfunctions, or the unavailability of necessary materials can cause delays. Working with experienced professionals who can anticipate and mitigate these challenges is essential to keep the project on track.
Tips and techniques to expedite the floor sanding process
When it comes to floor sanding, time is of the essence. Homeowners and businesses alike want to get their floors looking beautiful and back in use as quickly as possible. Luckily, several tips and techniques can help expedite the floor sanding process without compromising quality.
Firstly, proper preparation is critical. Before starting the sanding process, thoroughly clean the floor and remove any furniture or obstacles. This will allow for a smoother and more efficient sanding process, as there won’t be any hindrances or time wasted on moving things around.
Next, consider using a professional floor sanding machine. These machines are specifically designed to make the sanding process faster and easier.
They have powerful motors and specialised sanding pads that can remove old finishes and imperfections quickly and effectively. Investing in a high-quality machine can significantly reduce the time it takes to complete the sanding process.
Another technique to expedite floor sanding is to use the proper sanding grits. Starting with coarse grit and gradually moving to finer grits can save time by removing the top layers of the floor more efficiently.
However, it’s essential to be cautious and not skip grits too quickly, as this can result in uneven sanding and require additional time for correction.
Additionally, consider using a dustless sanding system. Traditional sanding methods can create a significant amount of dust, which not only slows down the process but also creates a mess that needs to be cleaned up afterwards.
Dustless sanding systems use specialised equipment that captures the dust as it is generated, keeping the workspace clean and reducing the need for extensive cleanup.
Lastly, having a skilled and experienced floor sanding professional can make a difference in expediting the process.
They will have the expertise to efficiently navigate the floor, identify the necessary techniques, and ensure a high-quality finish in a shorter timeframe. Hiring a professional can save you time, effort, and potential mistakes that could prolong the process.
By implementing these tips and techniques, you can expedite the floor sanding Geelong process and enjoy beautifully restored floors in no time. Remember, proper preparation, the right equipment, and skilled professionals can make all the difference in achieving efficient and outstanding results.
Importance of allowing sufficient drying and curing time
When it comes to floor sanding, one of the most crucial aspects often overlooked is allowing sufficient drying and curing time. Many people underestimate the importance of this step and rush to move furniture back in or start using the floor immediately after sanding.
However, failing to give the floor enough time to dry and cure properly can lead to disastrous consequences.
During the sanding process, the top layer of the floor is removed, exposing the raw wood underneath. This natural wood is porous and susceptible to moisture absorption.
If the floor is not given enough time to dry thoroughly, any residual moisture can become trapped within the wood, leading to warping, cupping, or even mould growth. Additionally, applying a finish or sealant before the floor is completely dry can result in a poor bond and a compromised final result.
The exact drying and curing time required can vary depending on various factors, such as the type of wood, humidity levels, and the specific products used.
Generally, it is recommended to allow at least 24-48 hours for the floor to dry after sanding. However, it is essential to consult with your flooring professional to determine the specific drying time needed for your particular project.
Curing time, however, refers to the period during which the finish or sealant needs to harden and set entirely. This can range from a few days to several weeks, depending on the type of finish used.
During this time, it is crucial to avoid any heavy traffic, moving furniture, or placing rugs or mats on the floor. Failure to observe the recommended curing time can result in premature wear and compromise the longevity of the finish.
By allowing sufficient drying and curing time, you not only ensure the longevity and durability of your freshly sanded floor but also minimise the risk of any potential damage.
It may require patience and temporarily adjusting your routine, but the result will be worth the wait. Remember, a beautiful and long-lasting floor is the reward for allowing the necessary time for proper drying and curing.
Final considerations for a successful floor sanding
When embarking on a floor sanding project, it is advisable to work with experienced professionals with the expertise and equipment to carry out the floor sanding job efficiently and effectively.
Hiring professionals not only ensures a high-quality outcome but also saves you time and effort in the long run. Timber Floor Sanding Melbourne boasts an impressive legacy of delivering top-tier flooring solutions with unmatched finesse. With our expertise, homeowners can expect timeless elegance and unparalleled durability, making every space a true embodiment of sophistication and warmth.
