Whether you have just moved into a new home with worn-out timber floors or want to revive the beauty of your existing floors, this timber floors sanding polishing guide will help you achieve stunning results with the right sanding and timber floor polishing Melbourne process.
Timber floors are not only visually appealing but also durable and long-lasting. Following this guide, you can bring life back to your floors and enjoy their natural beauty for years.
Preparing for Sanding:
Inspect your sandpaper and sanding tools to make sure they are in good condition and suitable for the specific surface you’ll be sanding.
Clear the area:
Before starting the sanding process, it is crucial to clear the room of furniture, rugs, and any other items that could obstruct your work.
This will ensure that you have enough space to maneuver the sanding equipment and prevent any accidental damage.
Additionally, cover adjacent areas with plastic sheets to protect them from dust generated during the sanding process.
Inspect and repair:
Take the time to carefully inspect your timber floors for any damages or loose boards. Addressing minor issues before sanding will prevent further damage and ensure a smoother process.
If you notice any loose boards, secure them back in place using nails or screws.
For minor scratches or dents, consider using wood filler to fill them in. This will ensure a more uniform and professional-looking result.
Gather the necessary tools:
To successfully sand your timber floors, you will need a few essential tools.
These include a drum sander, edger, sandpaper (coarse, medium, and fine-grit), safety gear such as goggles and a dust mask, and a vacuum cleaner for dust removal.
If you don’t own these tools, they can be rented from a local hardware store or purchased from various online retailers.

Sanding Process:
Before diving into the sanding process, ensure you’re wearing appropriate safety gear like goggles and a dust mask.
Start with coarse-grit sandpaper:
Begin the sanding process by using a drum sander equipped with coarse-grit sandpaper. This coarse grit is necessary to remove any old finishes, stains, or imperfections from the surface of the timber.
It will also help level the floor and prepare it for a smooth and even finish. Ensure you read and follow the manufacturer’s instructions for operating the drum sander safely and effectively.
Progress to finer-grit sandpaper:
Once you have completed the initial sanding with the coarse-grit sandpaper, it’s time to transition to medium and fine-grit sandpaper for a smoother finish.
Gradually progress from the coarse to the finer grits, always sanding toward the wood grain. Pay close attention to edges and corners, as they may require an edger or hand-held sander to achieve an even result.
Address imperfections:
During the sanding process, it’s common to encounter imperfections such as dents or scratches. Take the time to address these imperfections to ensure a flawless result.
For minor scratches, sanding them gently with fine-grit sandpaper should suffice.
However, for deeper scratches or dents, you may need a wood filler or putty to fill in the gaps. Don’t rush this step, as proper preparation is key to achieving optimal outcomes.
Cleaning Up:
After clearing away the clutter, it’s time to tackle the dust buildup. Begin by gently wiping down surfaces with a damp cloth to capture loose particles before moving on to deeper cleaning methods.
Dust removal:
After completing the sanding process, it is essential to remove all dust thoroughly. Dust particles can interfere with the application of the finish and mar the final result.
Start by vacuuming the entire area with a vacuum cleaner equipped with a brush attachment. Follow up with a damp mop or cloth to remove any remaining dust.
Ensure the area is completely dry before proceeding to the next step.
Filling gaps and cracks:
Inspect your timber floors for gaps or cracks that may have appeared during the sanding process. Use a wood filler or putty designed for timber floors to fill these gaps.
Apply the filler according to the manufacturer’s instructions and allow ample time to dry before proceeding to the next step.
Once dry, ensure the surface is smooth by sanding it lightly with fine-grit sandpaper.
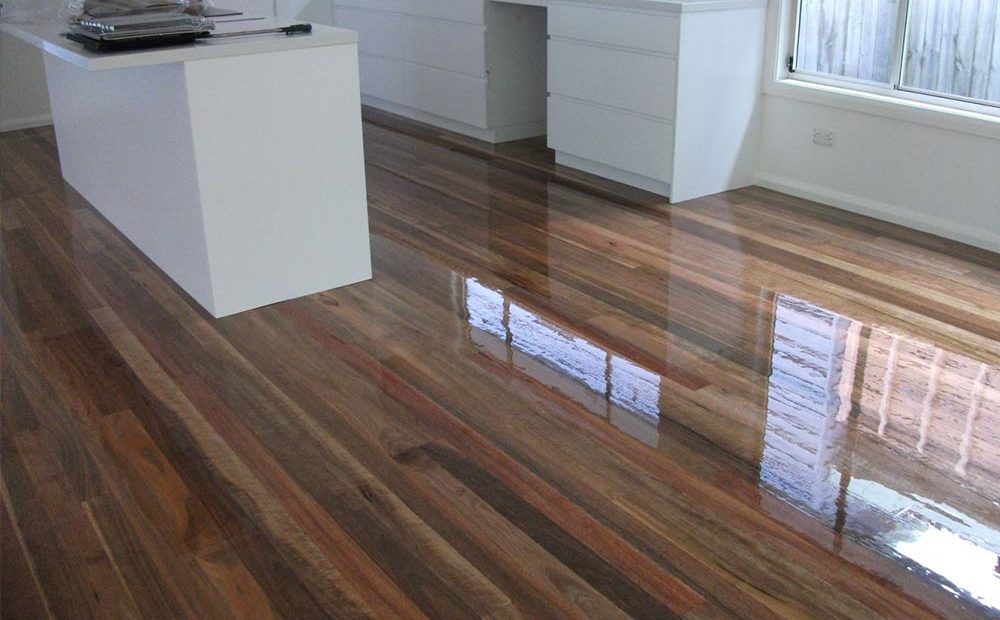
Polishing Process:
Before applying any finish, ensure the surface is clean and free of dust and imperfections.
Choosing the right finish:
Now that your timber floors are sanded and adequately prepared, it’s time to choose the right finish. Various finishes are available, including polyurethane, varnish, and oil-based options.
Each finish offers different levels of durability and aesthetics.
Consider factors such as the amount of traffic in the area and your desired look before deciding.
Research different finishes and seek professional advice for timber floor polishing Melbourne to ensure the best choice for your specific needs.
Applying the finish:
Once you have selected your desired finish, follow the manufacturer’s instructions for application. Start by applying the finish along the room’s edges using a brush or small roller.
Then, work your way across the floor using a lambswool applicator or a large roller for even coverage. Apply thin and even coats, allowing sufficient drying time between each coat.
Follow the manufacturer’s recommendations for the required coats for your chosen finish.
Recoating vs. refinishing:
A simple recoating process may be sufficient to rejuvenate your timber floors. Recoating involves applying a new layer of finish on top of the existing one without sanding back to bare wood.
However, if your floors are heavily damaged, or the existing finish is beyond repair, complete refinishing may be necessary.
Assess the condition of your floors and consult with professionals if you’re unsure of the best course of action.
By following these timber floors sanding polishing guidelines, professionals can transform your worn-out or tired timber floors into stunning features of your home.
Remember to maintain your floors regularly to preserve their beauty and longevity.
With proper care, your timber floors will continue to shine and add value to your home for many years to come.
Enjoy your newly refreshed timber floors with expert services. Timber Floor Sanding Melbourne offers top-notch services for restoring and refinishing hardwood floors. Using the latest equipment and techniques, we ensure a smooth and durable finish.
