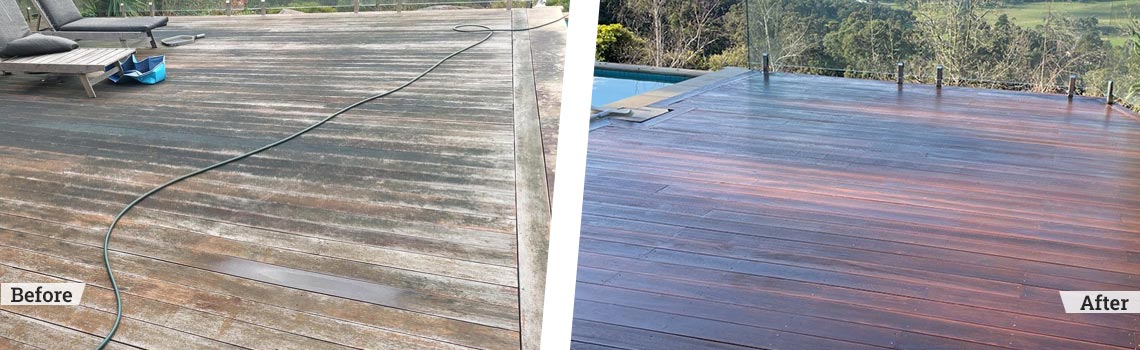
Restoring and painting an old deck can be a daunting task, but with the right knowledge and techniques, it can be a breeze. Whether you want to revamp your outdoor living space or increase the value of your home, decking restoration Melbourne is a great investment.
In this guide, we will provide you with expert tips and tricks to effortlessly restore and paint your old deck. From cleaning and repairing to sanding and staining, we will walk you through the entire process. Get ready to transform your worn-out deck into a beautiful and functional outdoor space!
Assessing the Condition of Your Deck
Before diving into the restoration process, it’s crucial to assess the condition of your deck. This step will help you identify any structural issues, such as loose boards or rotting wood, that need to be addressed before proceeding further.
Start by thoroughly inspecting each board, paying close attention to their stability and integrity. Look for signs of splintering, cracking, or warping, as these are indications of wear and tear. Additionally, check the support posts and railings for any signs of damage.
If you come across any structural issues, don’t panic. It’s better to address them now than to have problems arise later. Consider seeking professional help or consulting with a contractor for complex repairs.
Once you’ve assessed the condition of your deck, you can move on to the next step, which involves thoroughly cleaning the surface.
Preparing Your Deck for Restoration and Painting
Now that you have assessed the structural condition of your deck, it’s time to prepare it for the decking restoration Melbourne and the painting process. This step is crucial in ensuring a smooth and long-lasting finish.
The first step in preparing your deck is to thoroughly clean the surface. Remove any debris, dirt, or loose paint by using a stiff brush or a power washer. Pay special attention to the gaps between the boards and the hard-to-reach areas.
Next, you’ll want to use a deck cleaner or a mild detergent to remove any stains, mildew, or mould that may have accumulated over time. Follow the manufacturer’s instructions carefully and rinse the deck thoroughly with water once you’re done.
After cleaning the deck, it’s important to let it dry completely before moving on to the next step. Depending on the weather conditions, this may take a day or two. Remember, painting or staining a damp deck can lead to adhesion issues and a less durable finish.
Choosing the Right Materials and Tools
Now that your deck is clean and dry, it’s time to start thinking about the materials and tools you’ll need for the decking restoration Melbourne and the painting process. Choosing the right products will not only ensure a beautiful finish but also a long-lasting one.
When it comes to paint or stain, it’s important to select a product specifically designed for outdoor use. Look for options that offer UV protection, waterproofing, and durability. Consider factors such as the climate in your area, the amount of foot traffic your deck receives, and your personal preferences in terms of colour and finish.
In addition to the paint or stain, you’ll also need a high-quality brush or roller for application. For hard-to-reach areas or between deck boards, a paint pad or small brush can come in handy. Don’t forget about essential tools like sandpaper, putty, and a pry bar for any necessary repairs.
By investing in the right materials and tools, you can ensure a smooth and hassle-free restoration process.
Step-by-Step Deck Restoration Process
Now that you have gathered all the necessary materials and tools, it’s time to roll up your sleeves and start restoring your old deck. This step-by-step instruction will walk you through the process, making it easy and effortless.
Step 1: Sanding
Begin by sanding the entire surface of your deck. This will remove any rough spots, splinters, or old paint/stain, creating a smooth and clean canvas for the new finish. Use a power sander or sandpaper for this task, depending on the size of your deck and your personal preference.
Step 2: Repair
Check your deck for any rotten or broken planks. Replace them if needed. Fill any cracks or holes with wood putty, ensuring a seamless surface. Don’t forget to also check for loose nails or screws and tighten them.
Step 3: Cleaning
Before applying the new finish, thoroughly clean the deck surface to remove any dust, dirt, or debris. You can use a mild detergent and water solution, along with a scrub brush or pressure washer, to get the job done.
Step 4: Applying the Finish
Now comes the exciting part – applying the new paint or stain. Start by applying a thin coat, following the manufacturer’s instructions. Work in small sections, using a brush or roller for even coverage. Take your time and ensure that every inch is covered.
Step 5: Drying and Maintenance
In case a second coat is required, let the first coat completely dry before applying it. Follow the recommended drying times on the product label. Once the finish is dry, inspect your deck for any touch-ups or missed spots. Then, make sure to maintain your newly restored deck by regularly cleaning and reapplying the finish as needed.
By following these step-by-step instructions, your old deck will soon become a stunning outdoor space that you can enjoy for years to come.
Step-by-Step Process to Painting Your Restored Deck
Now that your deck is restored, it’s time to add the finishing touch by painting it. Follow this step-by-step guide to ensure a flawless and long-lasting paint job.
Step 1: Select the Right Paint
Choose a high-quality outdoor paint specifically designed for decks. Look for a paint that offers protection against UV rays, moisture, and mildew. Consider the colour scheme of your outdoor space and select a paint that complements it.
Step 2: Prepare the Surface
Before painting, make sure the surface is clean and dry. If needed, lightly sand any rough areas or peeling paint. Remove any dust and debris from the deck.
Step 3: Prime (if necessary)
If you have chosen a paint that requires a primer, apply it according to the manufacturer’s instructions. Paint will cover better and adhere better as a result of this.
Step 4: Start Painting
Begin by cutting in the edges of the deck using a brush. Then, use a roller or paint sprayer to apply paint to the larger areas. Work in small sections to ensure an even application. Be mindful of the drying time between coats, as recommended by the manufacturer.
Step 5: Apply Multiple Coats
To achieve a durable and vibrant finish, especially when working with acrylic deck restoration coating, it is essential to apply at least two coats of paint. Let every coat thoroughly dry before applying the next. This process ensures proper adhesion and durability of the coating.
It is advisable to apply thin coats to prevent sagging or dripping, which can compromise the overall quality of the finish. Taking these steps will not only enhance the aesthetic appeal of the deck but also contribute to the long-lasting protection and restoration of the surface.
Step 6: Seal the Paint
Once the final coat is dry, consider applying a clear sealant or topcoat specifically designed for painted decks. This will provide an extra layer of protection against the elements and make your paint job last longer.
By following these step-by-step instructions, you can transform your restored deck into a beautiful and inviting outdoor space.

Maintaining Your Deck’s Beauty and Longevity
Congratulations on successfully restoring and painting your old deck! Now that your deck is looking brand new, it’s important to keep it that way for years to come. Here are some tips to help you maintain its beauty and longevity:
1. Regular Cleaning: Keep your deck clean by sweeping away debris and dirt regularly. You can also use a mild detergent and water to scrub away any stubborn stains or dirt buildup. Avoid using harsh chemicals or power washers, as they can damage the paint and wood.
2. Inspect and Repair: Inspect your deck periodically for any signs of damage, such as loose boards, nails, or splintered wood. Repair or replace any damaged or worn-out parts promptly to prevent further deterioration.
3. Apply a Fresh Coat of Paint: Over time, your deck’s paint may start to fade or show signs of wear. Consider applying a fresh coat of paint every few years to keep it looking vibrant and protected.
4. Use Protective Mats and Furniture Pads: Place protective mats or pads under furniture legs and pots to prevent scratches or dents on the painted surface.
5. Avoid Dragging Heavy Objects: When moving heavy objects, avoid dragging them across the deck to prevent scratches or gouges in the paint.
6. Protect from Moisture: Be vigilant about water pooling on your deck, as excessive moisture can lead to rot and mould growth. Ensure proper drainage and use waterproofing products if necessary.
By following these maintenance tips, you can extend the life and beauty of your restored deck. Remember that prevention and regular upkeep are key to keeping your deck in tip-top shape.
FAQs
1. Why should I hire a professional for deck restoration?
Ans. Hiring a professional ensures expertise, quality work, and proper use of materials. They can address hidden issues and provide long-lasting results.
2. What’s the importance of thorough deck cleaning before painting?
Ans. Cleaning removes dirt, mould, and old finish, ensuring better adhesion for paint. It enhances the deck’s appearance and prolongs the coating’s lifespan.
3. How do I choose the right paint for my deck restoration?
Ans. Opt for high-quality, weather-resistant deck paint or stain. Consider the wood type, climate, and desired finish for durability and aesthetic appeal.
4. What is the significance of proper deck preparation before painting?
Ans. Adequate preparation, including sanding and repairing damaged areas, ensures a smooth surface. This promotes even paint application and improves the overall finish.
5. How can I protect my newly painted deck from future damage?
Ans. Apply a sealant or waterproofing product to safeguard against moisture, UV rays, and foot traffic. Regular maintenance, like cleaning and inspections, is crucial for longevity.
Conclusion: Enjoying Your Newly Restored and Painted Deck
In conclusion, transforming your old deck into a stunning outdoor space is a rewarding endeavour with the right knowledge and effort. Assessing and addressing structural issues, thorough cleaning, and choosing the right materials set the foundation. Following a step-by-step decking restoration Melbourne and painting process, from sanding to applying multiple coats, ensures a durable and vibrant finish.
Maintenance, including regular cleaning, inspections, and periodic paint touch-ups, is key to preserving the deck’s beauty and longevity. Whether you’re a DIY enthusiast or opt for professional assistance, the investment in your deck’s restoration promises years of enjoyment and increased home value.
At Timber Floor Sanding Melbourne, we take pride in delivering top-notch services to enhance the beauty and longevity of your deck, ensuring it becomes a focal point for relaxation and social gatherings. Trust us to bring out the best in your outdoor space and add value to your home with our expert deck restoration solutions.
