Whether your deck is a cosy spot for morning coffee or the hub of your summer barbecues, it plays a significant role in your outdoor living space. Exposure to the elements, however, can take a toll on its beauty and integrity.
Fear not, restoring your wooden deck isn’t as daunting as it might seem.
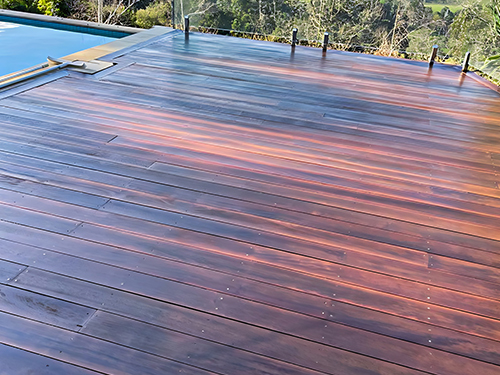
This beginner’s guide will walk you through the basics of decking restoration Melbourne, providing a clear, step-by-step process that will help you breathe new life into your aged or weathered deck.
From inspecting for damages to the final staining, you’ll learn how to make your deck look brand new.
Assessing Your Deck’s Condition
Before diving into cleaning or staining, the first step in decking restoration Melbourne process is a thorough assessment. This is crucial to identify any issues like wood rot or structural damage that might need addressing before further maintenance.
Here’s how to conduct a detailed inspection:
– Look for Wood Rot: Check areas where moisture accumulates or where wood contacts the ground. Use a screwdriver to probe the wood; if it penetrates easily or the wood feels spongy, it may be rotted and need replacement.
– Check for Loose Boards or Nails: Over time, boards can become loose, or nails may protrude. Tighten any loose screws and hammer down protruding nails.
– Examine for Cracks and Splinters: Small cracks can grow, and splinters can be hazardous. Note these areas for sanding or replacement.
This initial examination helps ensure that you’re not just covering up problems but rather addressing them head-on to extend the life of your deck.
Preparing for Deck Restoration
Assessing the Need for Restoration
Before you pick up a hammer or buy a single can of stain, you need to determine whether your deck actually needs a full restoration or just a bit of tidying up.
Start by taking a walk around your deck and look for signs of wear and tear that could affect its integrity and appearance.
Key issues to look for include loose boards, signs of rot (especially in areas close to the ground or where wood meets wood), and any discolouration or damage from the sun and rain.
Also, pay attention to the current finish—does it look old, peeling, or faded? If the answer to most of these questions is yes, it’s probably time to restore your deck.
Gathering Necessary Tools and Materials
Once you have decided that deck restoration is necessary, gather the tools and materials required for the job. You’ll need:
– Protective gear (gloves, goggles, and a dust mask)
– A screwdriver or hammer for inspecting and fixing loose boards
– A power washer or a high-quality deck-cleaning solution
– Sandpaper or a power sander
– Stain or sealant for the deck’s finish
– Paint brushes or rollers
– A cleaner for prepping the surface
– Optionally, replacement boards if there are any too damaged to be restored
Organising these items ahead of time will streamline the restoration process and ensure you aren’t interrupted during your work.

Step-by-Step Deck Restoration Process
Inspecting Your Deck for Damages
The first step in deck restoration is a thorough inspection. Carefully examine your deck for structural soundness.
Check for any loose nails or screws, and tighten them as needed. Look for cracked or rotting wood, especially in high-stress areas such as railings and the deck’s support structure.
It’s crucial to address these issues before proceeding with cleaning, sanding, or staining.
Cleaning Your Deck
Cleaning is crucial as it preps your deck for further restoration steps like sanding and staining. If your deck has mildew or dirt build-up, start with a power washer if available, or use a deck cleaning solution with a stiff brush to scrub down the surface.
This will remove grime, peeling paint, and other elements that can hinder the effectiveness of stains and sealants. After washing, allow your deck to dry completely before moving to the next step, which could take a couple of days, depending on the weather conditions.
Sanding Your Deck
Once the deck is dry, sanding helps smooth any rough patches and removes the remnants of the old finish, providing a fresh surface that’s ideal for a new coat of stain or sealant.
If the deck is large, use a power sander; for smaller areas or corners, hand sanding might be necessary. Sand in the direction of the wood grain to avoid scratching the surface.
After sanding, wipe the deck down with a damp cloth to remove dust and debris, ensuring it’s perfectly clean before you apply any finishing products. This attention to detail will result in a smoother and more durable finish.
Finishing Touches: Staining or Oiling Your Deck
Choosing the Right Product
When it comes to the finishing touches on your deck, choosing between staining and oiling is a crucial decision that will affect the appearance and longevity of your project.
Decking oils penetrate deep into the wood, offering enhanced protection and giving the wood a slightly glossy, enriched hue that highlights its natural grain.
Oils are typically easier to reapply and maintain. On the other hand, stains provide a more robust surface coating. They come in a variety of opacities—from clear to solid colours—that can significantly alter the appearance of your deck while also protecting it from environmental elements.
When selecting a product, consider your deck’s exposure to weather, the natural colour and condition of the wood, and how much of the wood’s natural grain you wish to see.
Application Tips for Best Results
Applying oil or stain to your deck can make a significant difference in its appearance and durability. Here are some tips to help ensure the best results:
– Preparation: Make sure the deck is clean, dry, and sanded smoothly. Any previous finish should be properly removed, and the wood should be free of dust.
– Application Tools: Use brushes or rollers specifically designed for oil or stain; these tools help ensure a more even application. For oils, a pad applicator or cloth can also be effective.
– Technique: Apply thin coats rather than a thick one. This enhances absorption and adherence, reducing the risk of peeling or flaking. Always follow the grain of the wood.
– Drying Time: Allow adequate time for the product to dry before applying additional coats. Rushing this process can lead to tacky finishes and poor protection.
– Weather Conditions: Opt for a dry, mild day for application. High humidity or extreme temperatures can affect the finish.
Maintaining Your Restored Deck
Routine Cleaning and Maintenance
Maintaining your restored deck is vital to preserving its beauty and extending its life. Simple routine tasks can prevent significant damage:
– Regular Cleaning: Sweep the deck regularly to remove debris and dirt. Annually, a more thorough cleaning with a deck cleaner will help maintain the integrity of the finish.
– Immediate Spill Cleanup: Quickly address any spills—especially oil, grease, or acidic substances—to prevent stains.
– Furniture Movement: Periodically move planters, chairs, and tables to avoid discolouration and moisture traps.
Addressing Minor Issues Promptly
Even with the best preparation and maintenance, minor issues may arise, such as loose nails, slight warping, or small areas of flaking finish. Here are some tips on addressing these promptly:
– Regular Inspections: Check for signs of wear or damage as part of your routine cleaning. Early spring is a good time for a detailed inspection.
– Tighten or Replace Fasteners: Loose nails or screws can further damage wood if left unattended. Tighten or replace them as necessary.
– Touch-Up Finishes: If you notice small areas where the finish has worn away, touch up these spots immediately to prevent further deterioration.
– Manage Mildew and Mold: Use a deck cleaner formulated to address mould and mildew. These fungi can quickly degrade wood if not controlled.
Deck restoration might seem daunting at first, but with these steps, you’re well-equipped to tackle the project and achieve great results.
Wrapping Restoration Journey
Restoring your deck can be a rewarding project that not only enhances the beauty of your home but also extends the life of your outdoor space.
By following the step-by-step decking restoration Melbourne guide provided – inspecting for damages, cleaning thoroughly, sanding down the surface, and finally staining or oiling – you can rejuvenate your wooden deck yourself.
Remember that regular maintenance can prevent larger issues down the line and keep your deck in prime condition for years to come.
Whether you choose the natural enhancing properties of decking oil or opt for the protective seal of wood stain, the effort you put into restoring your deck will pay off, providing a beautiful and durable area to enjoy with family and friends.
If you’re finding the task overwhelming or simply don’t have the time due to a busy schedule, consider turning to the professionals at Timber Floor Sanding Melbourne.
Our team specialises in decking restoration and ensures your deck is not just visually appealing but also long-lasting. We handle everything from inspecting for damages to the final touches of staining or oiling, ensuring a meticulous finish.
